How to evolve an application to make it more robust and maintainable - Setting up the test
Foreword
In the introductory article of this series (link) we presented the different problems of our application (add link). The first one I propose to solve in this article is the addition of tests. The purpose of adding tests is not only to increasing the code coveragecover the code and pass a quality gate; it is there to validate the business rules and allow refactoring with less risk. In this article we will look at how to add tests to an application that does not have any. We will discuss unit tests, integration tests and system tests
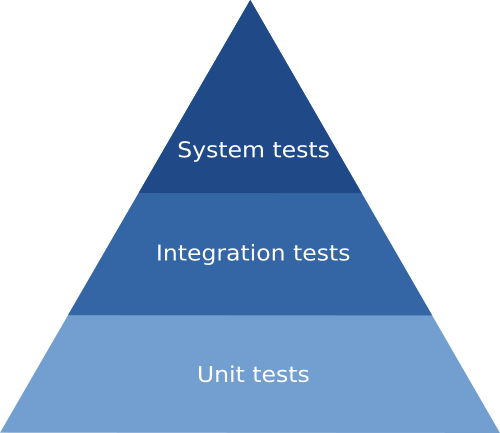
Definitions of the different types of tests
A unit test is a test that only checks the method of a class or a class. External classes, often called “collaborators”, that might be called will be mocked. We will place unit tests mainly on services that must contain business code, i.e. code with added value. An integration test is a test that aims to verify the correct integration of certain parts of a process and not the process as a whole. We will concentrate our integration tests on endpoints and repositories. A system test is a black-box test that verifies that the entire use case works.

In a case such as that of our application, where no tests exist, it is preferable to start with a system test to quickly verify the correct operation and non-regression of a functionality, and then to increase the unit tests and integration tests.
Unit testing
Since our application is in Java we will use as libraries for the tests: Junit5, Mockito and AssertJ.
Setting up the test
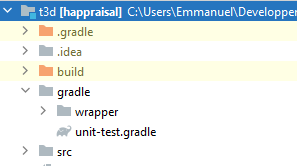
The dependencies are to be added in the build.gradle but for readability reasons I prefer to create a unit-test.gradle file which will contain all the necessary configurations. This file is called by the build.gradle file
Location of the unit-test.gradle file

Contents of the unit-test.gradle file
1dependencies {
2
3   testImplementation group: 'org.junit.jupiter', name: 'junit-jupiter', version: '5.8.2'
4   testImplementation group: 'org.mockito', name: 'mockito-junit-jupiter', version: '4.2.0'
5   testImplementation group: 'org.assertj', name: 'assertj-core', version: '3.21.0'
6   testImplementation group: 'org.mockito', name: 'mockito-core', version: '4.2.0'
7}
In the build.gradle file
1apply from: "gradle/unit-test.gradle"
Implementation of a test
The rules for writing a unit test :
- Each test must be created in the test directory
- Each test class is in the same package as the class it tests
- The names of the test methods are in snack_case ( (cf https://en.wikipedia.org/wiki/Snake_case )
- The number of things tested should be limited, ideally to 1.
Example of a test
 1
 2@Test
 3void should_add_question_to_form() {
 4 // given
 5 var formId = UUID.fromString("18b8f2e2-f41c-4ca4-a007-c328390cd099");
 6 var savedForm = new Form();
 7 var existingQuestion = new QuestionAnswer(formId, "What is your first name", null, savedForm);
 8 var questions = new HashSet<QuestionAnswer>();
 9 questions.add(existingQuestion);
10 savedForm.setQuestions(questions);
11 savedForm.setId(formId);
12
13 BDDMockito.when(formRepository.getById(formId)).thenReturn(savedForm);
14
15 var questionToSave =
16     new QuestionAnswer(null, "What is your objectives for the next year", null, null);
17
18 // when
19 formService.createQuestion(formId, questionToSave);
20
21 // then
22 var questionAnswerArgumentCaptor = ArgumentCaptor.forClass(QuestionAnswer.class);
23
24 BDDMockito.then(questionAnswerRepository).should().save(questionAnswerArgumentCaptor.capture());
25 var actualQuestions = questionAnswerArgumentCaptor.getValue();
26 BDDSoftAssertions.thenSoftly(
27     softly -> {
28       softly.then(actualQuestions).isNotNull();
29       softly.then(actualQuestions)
30               .extracting("form.questions", Assertions.as(InstanceOfAssertFactories.COLLECTION))
31               .hasSize(2);
32     });
33}
Code details
The most important points are
- The use of mocks to simulate the behaviour of methods of other classes that are called
1BDDMockito.when(formRepository.getById(formId)).thenReturn(savedForm);
- The use of ArgumentCaptor to catch and then validate the form passed to the save method of the repository
1 var questionAnswerArgumentCaptor = ArgumentCaptor.forClass(QuestionAnswer.class);
2
3 BDDMockito.then(questionAnswerRepository).should().save(questionAnswerArgumentCaptor.capture());
4     var actualQuestions = questionAnswerArgumentCaptor.getValue();
- The use of SoftAssertions to be able to check several things. Unlike validation via the Assertions class, which will raise an error on the first error, SoftAssertions will test all conditions and raise errors afterwards.
1 BDDSoftAssertions.thenSoftly(
2     softly -> {
3       softly.then(actualQuestions).isNotNull();
4       softly.then(actualQuestions)
5               .extracting("form.questions", Assertions.as(InstanceOfAssertFactories.COLLECTION))
6               .hasSize(2);
7     });
Integration testing
Setting up the test
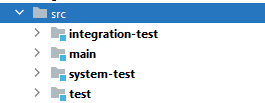
To set up the integration tests we will create a directory at the same level as the test and main directories.

The separation of unit tests and integration tests has the advantage of allowing us to distinguish which type of tests we want to run and when; this will be useful when setting up the CI/CD. The configuration will be done in the same way as for unit tests via a separate gradle file.
Location of the integration-test.gradle file

Content of the integration-test.gradle file
 1sourceSets {
 2    integrationTest {
 3        java {
 4            compileClasspath += sourceSets.main.output
 5            runtimeClasspath += sourceSets.main.output
 6            srcDir file('src/integration-test/java')
 7        }
 8        resources.srcDir file('src/integration-test/resources')
 9    }
10}
11
12configurations {
13    integrationTestImplementation.extendsFrom implementation
14    integrationTestRuntimeOnly.extendsFrom runtimeOnly
15}
16
17dependencies {
18    integrationTestImplementation group: 'org.springframework.boot', name: 'spring-boot-starter-test'
19    integrationTestImplementation group: 'org.mockito', name: 'mockito-core', version: '4.2.0'
20    integrationTestImplementation group: 'org.mockito', name: 'mockito-inline', version: '4.2.0'
21}
22
23tasks.register('integrationTest', Test) {
24    description = 'Runs integration tests.'
25    group = 'verification'
26
27    testClassesDirs = sourceSets.integrationTest.output.classesDirs
28    classpath = sourceSets.integrationTest.runtimeClasspath
29    shouldRunAfter test
30    useJUnitPlatform()
31}
32
33check.dependsOn integrationTest
Dans le fichier build.gradle
1apply from: "gradle/unit-test.gradle"
2apply from: "gradle/integration-test.gradle"
Implementation of a test
As the integration tests takeare longer, we will limit them to controllers and repositories; services, as we have seen above, are tested by unit tests. At the level of controllers, the objectives will be to verify that the endpoints respond correctly, i.e. we will verify :
- the validity status returned.
- error feedback due to invalid parameters or in the body of the request
The services called in the controllers will be mocked, and the calls to the service methods can be validated. This way of testing makes us understand why it is necessary to limit the business code in the controllers. At the repository level, we will check the validity of the requests, concentrating initially on the most complex requests.
Example of a controller integration test
 1@WebMvcTest(controllers = InterviewController.class)
 2public class InterviewControllerITest {
 3
 4 @Autowired Jackson2ObjectMapperBuilder mapperBuilder;
 5
 6 @Autowired private MockMvc mockMvc;
 7
 8 @MockBean private InterviewService interviewService;
 9
10 @Test
11 @DisplayName("Should get all interviews")
12 void should_get_persons() throws Exception {
13   // when
14   mockMvc
15       .perform(
16           MockMvcRequestBuilders.get("/interviews")
17               .contentType(MediaType.APPLICATION_JSON)
18               .accept(MediaType.APPLICATION_JSON))
19       .andExpect(MockMvcResultMatchers.status().isOk());
20
21   // then
22   BDDMockito.then(interviewService).should().findAll();
23 }
Example of a repository integration test
 1
 2@DataJpaTest
 3@ActiveProfiles("it")
 4public class FormRepositoryITest {
 5   @Autowired
 6   private FormRepository formRepository;
 7
 8   @Test
 9   void should_create_form() {
10       // given
11       var questionAnswer = new QuestionAnswer(null, "What do you think about your work this year", null, null);
12       var formToSave = new Form(null, Set.of(questionAnswer));
13
14       // when
15       var actualForm = formRepository.save(formToSave);
16
17       // then
18       var idNotNull = new Condition<Form>((Form form) -> form.getId() != null, "form id not null");
19       var asOneQuestion = new Condition<Form>((Form form) -> form.getQuestions().size() == 1, "form has only one question");
20       BDDAssertions.then(actualForm)
21               .as("Check if a new form has been saved.")
22               .has(idNotNull)
23               .has(asOneQuestion);
24   }
Code details
end-point testing
For endpoint tests we annotate the test classes with @WebMvcTest, which allows us to load a minimal environment in order to test only the controller defined in the annotation.
1@WebMvcTest(controllers = InterviewController.class)
The spring MockMvc class allows endpoint testing without loading the entire application context.
1   mockMvc
2       .perform(
3           MockMvcRequestBuilders.get("/interviews")
4               .contentType(MediaType.APPLICATION_JSON)
5               .accept(MediaType.APPLICATION_JSON))
6       .andExpect(MockMvcResultMatchers.status().isOk());
In order to test only the endpoint (return code, returned object …) we mock the service which is called with the @MockBean annotation of Sspring
1 @MockBean private InterviewService interviewService;
Repositories testing
Integration tests between a repository and the database are done with the @DataJpaTest annotation When testing the registration of an object, it is possible to check the generated identifier of the object in return
For methods like find, findAll, findId we can use the @Sql annotation to populate the database before testing. This is useful when the database at startup is empty. Here I have not done this but it is quite possible to start the tests with a pre-initialised database.
1@Sql(scripts = {"/sql_scripts/initialize_form.sql"} )
System testing
Setting up the test
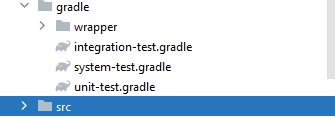
As with the integration tests, the system tests are in a separate directory; the configuration is in the file system-test.gradle.

Location of the system-test.gradle file

Contents of the system-test.gradle file
 1sourceSets {
 2   systemTest {
 3       java {
 4           compileClasspath += sourceSets.main.output
 5           runtimeClasspath += sourceSets.main.output
 6           srcDir file('src/system-test/java')
 7       }
 8       resources.srcDir file('src/system-test/resources')
 9   }
10}
11
12configurations {
13   systemTestImplementation.extendsFrom implementation
14   systemTestRuntimeOnly.extendsFrom runtimeOnly
15}
16
17dependencies {
18   systemTestImplementation group: 'org.springframework.boot', name: 'spring-boot-starter-test'
19   systemTestImplementation group: 'io.rest-assured', name: 'rest-assured', version: '4.4.0'
20   systemTestImplementation group: 'org.mockito', name: 'mockito-core', version: '4.2.0'
21   systemTestImplementation group: 'org.mockito', name: 'mockito-inline', version: '4.2.0'
22
23
24}
In the build.gradle file
1
2apply from: "gradle/unit-test.gradle"
3apply from: "gradle/integration-test.gradle"
4apply from: "gradle/system-test.gradle"
5
6systemTest {
7  shouldRunAfter integrationTest
8}
Implementation of a test
 1
 2@SpringBootTest(webEnvironment = SpringBootTest.WebEnvironment.RANDOM_PORT)
 3class PostInterviewTest {
 4 @Autowired Jackson2ObjectMapperBuilder mapperBuilder;
 5
 6 @LocalServerPort
 7
 8 private Integer port;
 9
10 @BeforeAll
11 public static void setup() {
12   RestAssured.baseURI = "http://localhost";
13 }
14 @Test
15 @Sql(scripts = "/sql_scripts/init_database.sql")
16 void should_create_interview() throws JsonProcessingException {
17   var manager =
18       new Person(UUID.fromString("8a37adbc-0c29-491a-8b6f-f10a4219fb91"), null, null, true);
19   var employee =
20       new Person(UUID.fromString("3556c835-3bcd-420e-bb6e-a8b7c0bb139d"), null, null, false);
21   var form = new Form(UUID.fromString("df9b2aad-d32e-469e-b434-be71a5531a35"), new HashSet<>());
22   var interview = new Interview(null, Instant.now(), manager, employee, form);
23
24   RestAssured.given()
25           .header("Content-type", "application/json")
26           .and()
27           .port(port)
28       .body(mapperBuilder.build().writeValueAsString(interview))
29       .when()
30           .post("/interviews")
31       .then()
32           .statusCode(HttpStatus.SC_CREATED);
33 }
34}
Code details
The points to note in this test are:
- The use of the SpringBootTest annotation to load the entire spring context.
- The use of RestAssured to test endpoints.
Summary
- There are three types of test bases: unit tests which test a method and only the content of the method, integration tests which validate the correct integration between two layers (endpoint calls, repository/database connections) and finally system tests which validate the correct operation of a functionality.
- For an existing API without tests, it is possible to start by setting up system tests on the most critical endpoints and then gradually adding integration and unit tests.
- For a new API it is best to start with unit testing and progress to system testing
If you have any comments on the content, the form you can leave a comment…it is by exchanging that we progress.
Author : Emmanuel Quinton Reviewer : Daniele Cremonini
Comments